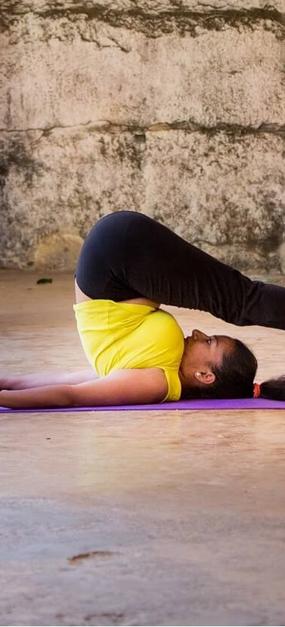
Sarvangasana or shoulder stand is a yoga pose wherein the whole body is balanced on the shoulders. ‘Sarv’ means all, ‘anga’ means part of a body, and ‘asana’ is posture. As the name indicates, Sarvangasana influences the functioning of all parts of your body. This asana is highly beneficial in maintaining the mental and physical health and is also referred as ‘Queen of asanas’.
The asana is pronounced as sar-vong-ah-sa-na
It is also a part of the Padma Sadhana yoga sequence.
How to do Sarvangasana
- Lie on your back with hands by your side.
- With one movement, lift your legs, buttocks and back so that you come up high on your shoulders. Support your back with the hands.
- Move your elbows closer towards each other, and move your hands along your back, creeping up towards the shoulder blades. Keep straightening the legs and spine by pressing the elbows down to the floor and hands into the back. Your weight should be supported on your shoulders and upper arms and not on your head and neck.
- Keep the legs firm. Lift your heels higher as though you are putting a footprint on the ceiling. Bring the big toes straight over the nose. Now point the toes up. Pay attention to your neck. Do not press the neck into the floor. Instead keep the neck strong with a feeling of tightening the neck muscles slightly. Press your sternum toward the chin. If you feel any strain in the neck, come out of the posture.
- Keep breathing deeply and stay in the posture for 30-60 seconds.
- To come out of the posture, lower the knees to forehead. Bring your hands to the floor, palms facing down. Without lifting the head slowly bring your spine down, vertebra by vertebra, completely to the floor.
- Lower the legs to the floor. Relax for a minimum of 60 seconds.
- Hold the sarvanga-asana anywhere from one to five minutes depending on comfort. Repeat the posture two or three times.
Benefits of Sarvangasana
- Stimulates the thyroid and parathyroid glands and normalizes their functions
- Strengthens the arms and shoulders and keeps the spine flexible
- Nourishes the brain with more blood
- Stretches the heart muscles by returning more venous blood to the heart
- Brings relief from constipation, indigestion and varicose veins
Contraindications
Consult your physician before doing the Sarvangasana if you have any of the following health conditions: pregnancy, menstruation, high blood pressure, heart problem, glaucoma, slip disc, spondylosis, neck pain and acute thyroid problem.
All Yoga Poses Previous yoga pose: Pawanmuktasana Next yoga pose: HalasanaFAQ’s on Sarvangasana (Shoulder Stand)
A beginner should practice Sarvangasana following these steps: Lie on your back. Hands by your side. Be ready to support your back with your hands. In one go lift your legs, buttocks, and back to come high on your shoulders. Keeping your legs firm, uplift your heels higher. Don’t press your neck to the floor. Keep it firm. Breathing in stay in the pose for 30 sec or up to 3 minutes. Lower our knees, legs, spine, vertebra by vertebra, on the floor. Bring hands by the side. Relax for a minute.
Stay in Sarvangasana pose for 30 seconds. If you feel comfortable slowly start increasing the time up to 3 minutes in the pose. Relax for a minute after the asana.
Sarvangasana is good for: Strengthens limbs, Spine becomes flexible, Constipation, Varicose veins, Stimulates the thyroid and parathyroid glands, Blood circulation in the brain improves.
People shouldn’t do Sarvangasana: with blood pressure, heart problems, glaucoma, slip disc, spondylosis, and acute thyroid problem in pregnancy and menstruation.