Gone are the days when ‘small is good’ was the motto. Today we want everything to be better than the rest. Better house, better salary, better grades; even a better world. The strive for perfection is driving us all crazy. You may say, ‘It is all about evolution’! But the pace at which we are evolving is taking a toll on our health: mental, physical and emotional.
Our desires have taken shape of needs and the fulfillment of these needs requires commitment towards work. In due course we overstrain ourselves, converting the body to a factory. Wear and tear follows next. A very common ailment that affects most of us then is neck pain.
Cervicalgia, as neck pain is better known as in medical terms, arises mostly from long, continuous hours of sitting in the same posture or a rough night of sleep and reduced workout. When the causes of neck pain are simple, why not the cure?
That’s the point! To do away with the ‘pain in the neck’, we bring you Seven Simple Steps (asanas or yoga postures) that are easy-to-do and won’t eat into your daily busy schedule. The best part of yoga is that it has been into existence for more than five thousand years and it’s still going strong.
Yoga Asanas for Neck Pain Relief
- Balasana or Child Pose
- Natrajasana or Reclining Twist
- Marjari Asana or Cat Pose
- Viparita Karani Asana or Legs-up-the-wall Pose
- Utthita Trikonasana or Extended Triangle Pose
- Savasana or Corpse Pose
- Sarvangasana
Now let us see the simple step-by-step Yoga asanas that can relieve you of neck pain. Make sure you do them only after consulting your doctor, and, also, learn them only from a qualified Sri Sri Yoga teacher. Also, do only as much as your body is comfortable with.

1. Balasana or child’s pose: Kneel on the floor/Place your shin on the floor with toes touching each other. Sit on your heels. With hands by your side, exhale and lay your torso down between your thighs/bend from the waist laying your torso between your thighs. Slowly allow your head to touch the ground. Do as much as possible and don’t strain yourself. Your hands should be resting by the sides of your torso with palms facing upward. Stay in this pose for as far as possible and slowly while inhaling lift yourself back to the same position.Place your hands on your thighs with palms facing the ceiling as in a state of surrender to God. This pose not only provides relief from your neck pain and back pain but also calms your brain. It stretches the hips, thighs and ankles and makes you feel fresh like a child!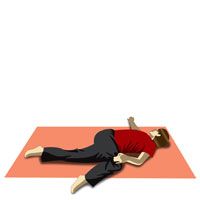
2. Natraja Asana or Reclining Twist: Lie on the floor with your back straight. Slowly lift your right leg and bring it over your left leg. While the left leg remains straight, make sure that the right leg makes a right angle on the floor. Stretch your hands either ways and face rightwards. Take a few deep breaths, while being in this pose for thirty seconds. Repeat the same with your left leg. While making your muscles more flexible, it takes you to that state of contentment and bliss. Interestingly, this is the dancing pose of Shiva. Feel that Shiva tattva everywhere!
3. Bitilasana or Cow Pose: Start with your shin placed on the floor and the rest of the body postured in a table-top position (that is with your thighs, torso and hands). Make sure to have your knees directly below your hips and your wrists, elbows and shoulders must be in line, perpendicular to the floor and so should be your thighs. Your torso must be parallel to the floor. Being in this posture, inhale and pull your tummy inwards towards the floor and lift your head upwards. Remain in this posture for a while and follow with the Cat posture (given below). 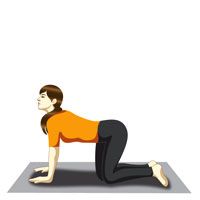
4. Marjaryasana or Cat Pose: Sequentially, exhale and round your spine towards the ceiling and bring your head inwards. Gently bring your chin towards your chest. Continue these two poses (cow and cat pose) in sequence while you inhale and exhale. Doing this would provide a gentle massage to your spine and belly organs absolutely free of cost, while also relieving you of neck pain!
Just for fun, you may imitate the voice of a cow and a cat while doing the Cow and Cat Pose: the feel-good factor!
5. ViparitaKarani asana or Legs-up-the-wall: This one’s simple. Just lay on your back with your legs straight against the wall. Feet must face the ceiling and your legs should be touching the wall. Rest with your arms out to the sides and palms facing upward. Take deep long breaths and breathe out at least fifteen times before you switch to the next pose. This yoga pose gently stretches the back of the neck, relieves mild backache and eases fatigue, helps in avoiding cramps and feet.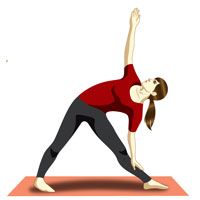
6. UtthitaTrikonasana or Extended Triangle Pose: Initially, you stand straight. Now separate your legs as much as you can. With your back straight, extend your hands sideward. Inhale and slowly bend towards the right side, with your right hand touching your ankle and your left hand directed upwards. Look at your left hand while you are positioned in this posture. Remain in this posture as long as you can. Remember, not to stretch yourself beyond your limits. The purpose of Yoga is to relieve you from pain, not to give additional pain.
Let us see what follows next!
7. Savasana or Corpse Pose: Whoa! This one is the simplest of all. This to-do step requires that you do just nothing! It requires the body to be placed in a neutral position. Lie on the floor, straight. Keep your neck and back straight and feet slightly separated. Hands must be by the sides, facing upwards. This is supposed to be the last in the sequence of asanas or yoga postures. The body must be in this position for at least five minutes for deep relaxation to muscles and self.
You can bid your neck pain goodbye by following these simple yoga poses and live a relaxed, stress-free life. But, do remember, you need to do these with consistency and commitment to see results.
Yoga practice helps develop the body and mind bringing a lot of health benefits, but is not a substitute for medicine.
It is important to learn and practice yoga postures under the supervision of a trained Sri Sri Yoga teacher. All asanas have contraindications.
In case of any medical condition, practice yoga postures after consulting a doctor and a Sri Sri Yoga teacher.
Find an Sri Sri Yoga course at an Art of Living Centre near you.
Do you need information on courses or wish to share feedback? Write to us at info@artoflivingyoga.org.


